If this 6.0 release were an ice cream, it would be the flavor of fluidity. From importing a photo from your phone to organizing your team’s resources into folders—not to mention improved annotations, file sharing in chat, and categorizing group projects—this version streamlines your entire content workflow. Add to that scheduled recordings and ready-to-use attendance reports…and you’ll find that a whole host of small, tedious tasks disappear. These new features free up your mental bandwidth and let you stay lighthearted. 🛟
🤳Project and annotate photos from a smartphone
🗃️Create folders in the document library (Organisation/Personal)
🖇️ Share attachments + 🗑️ delete messages in the chat
⏺️ Schedule a video recording / transcript
🖱️Annotations: select multiple items + 🎨 configure the style in advance
⬆️ / ⬇️ Change the order of items in the table library


Organisation Management:
📊 Export ready-to-use Attendance Records
🔎 Simplify Space Searches
Project and annotate photos from a smartphone
With very young children, for example, we’ve observed language-based treasure hunts:“Show me a… backpack!” The children then go look for an object at home before showing it to the camera. With older students, laptops are passed around the house or office during icebreakers to give others a glimpse into their work environment.
This new feature will further expand the range of possibilities. By simply scanning a QR code, your participants can now send a photo taken with their smartphone directly to the virtual whiteboard, then annotate it collaboratively.
Correct a test, an equation, a diagram, or a drawing; build a mood board from photos taken in the field; share a handmade project…or simply show off your best vacation selfies when school starts again: it’s up to you to come up with the uses!
Import a single image or embed photos into a document currently being projected (PDF / Whiteboard) :
⚙️ How to
To import a single image:
1. Click the blue + (Project New Content) > Document and Whiteboard.
2. Select Import a File > Take a Photo.
3. Scan the QR code displayed on the screen with your phone.
4. Choose the Take a Photo or Select from Gallery option.
5. Crop the image if necessary, then tap Project.
6. The content appears on the board, and the annotation tools become available.
To add photos to an existing PDF or whiteboard :
1. Project your PDF or blank page.
2. In the annotation tools, click the Image icon.
3. Select “Take a Photo” and follow the on-screen instructions.
Note: This process allows you to position, resize, and overlay multiple images on the same document.
🗃️Create folders in the document library (Organisation/Personal)
As you looked at the previous GIFs, did you notice anything? The PDF and whiteboard import window has been redesigned to highlight the content library, which now supports a folder tree structure. Use this to organize frequently used PDFs and activity templates into personal folders. Another folder structure is available at the organizational level to quickly make presentations, whiteboard templates, audiobooks, and more—all in their latest, up-to-date versions—available to all your facilitators.
💡Reminder regarding permissions: Currently, only super administrators can publish content within the Organisation (via Access Management, accessible from the three-dot menu on a document). Please feel free to contact us if you’d like to create a specific role for this task for your engineers and instructional designers.
⚙️ How to
Create a folder in your personal library:
1. Go to the blue + > Document & Whiteboard.
2. Click the green “Create a Folder” button and name it.
3. To save a document, click the three vertical dots and select the destination folder.
Search for a document within the organisation :
1. Go to the blue “+” > Documents & Whiteboard > Organization tab.
2. Navigate through the tree view (list view or grid view) or use the search bar.
3. Use the Advanced Criteria pane to filter by type (original PDF, activity template, whiteboard, with/without audio).
🖇️ Share attachments + 🗑️ delete messages in the chat
A long-awaited feature: you can now quickly share images (with previews), PDFs, and ZIP files in ’s Live Chat via drag-and-drop or by clicking the paperclip icon: Attach a File.
For example, send one or more memo sheets at the end of your sessions. Better yet, personalize your instructions by discreetly sending cards to a participant via Private Chat.
And for those who make typos, easily delete your message by hovering over it and then clicking the trash can icon: Delete. This feature also helps moderators manage discussions by allowing them to delete any problematic messages.
💡To prevent potential out-of-control situations or cheating, the space’screators / administrators can disable private chats between participants while still allowing them to contact the moderator privately.
⚙️ How to
1. Hover over the space name in the bottom-left corner
2. Click on ” Enable features“
3. Uncheck only “Allow private chats between participants”
Participants can now chat privately only with the moderators.
⏺️Schedule a video recording / transcript
Thanks to the auto-stop feature, the days of 5-hour recordings caused by a simple oversight are already over… But you still have to remember to start the recording!
So we thought: why not just schedule it entirely?!
Are you hosting a workshop or meeting tomorrow at 10 a.m.? Go to your dashboard today, open the Recording menu, choose Video or Transcript, enter the start and end times for your session, then click “Schedule Recording.”
And to help those of us who tend to have our heads in the clouds, another new feature is here: space creators and administrators can now display a reminder prompting facilitators to start or schedule a recording as soon as they enter the space. A little safety net that will ensure your participants get a replay and your colleagues get session notes!
🖱️Annotations: select multiple items + 🎨 configure the style in advance
Every time you project a PDF or a Blank Page (Whiteboard), you’ll have access to an annotation toolbar: text, lines, highlighting, images, sticky notes (Post-its), shapes, emojis, audio…
A new tool lets you draw a box to select, move, or delete multiple annotation elements at once. This lets you quickly free up space on your document.
Based on your feedback, we’ve also improved the usability of these tools: instead of creating a shape or a Post-it note and then changing its color afterward, you can now set the color before creating it. The same goes for line thickness, font size, and more…
⚙️ Click on the desired tool to display its various options above it, draw your line or shape, then click on the tool again to deselect it.
💡And to be even more efficient, keyboard shortcuts work on PDFs and Whiteboards: scroll through slides (left/right arrows) or zoom in and out of the document (+/-). Select all annotations on a slide (Ctrl+A), delete them (Backspace or Delete), copy them (Ctrl+C), and finally paste them (Ctrl+V)!
⬆️ / ⬇️ Change the order of items in the table library
The table library is one of Glowbl’s most useful features. Accessible via a drop-down menu at the top of the table, it lists all the documents that have been projected there. It lets you navigate between these items while remembering the last slide viewed in a PDF or the exact timecode of a paused video.
However, as the number of items grows, it can become difficult to find your way around. Handles have therefore been added so you can reorder the documents in the drop-down menu using drag-and-drop.
This manual sorting makes it easier to manage the order of presentation during presentations or debriefings, particularly for reordering content retrieved from the Space’s “Contents” folder.
Organisation Management: Save Time and Improve Accuracy
Available exclusively to Organisation Managers and Super Administrators from the Organisation Management dashboard , your organisation’s administration and data collection capabilities are enhanced:
📊 Export ready-to-use Attendance Records
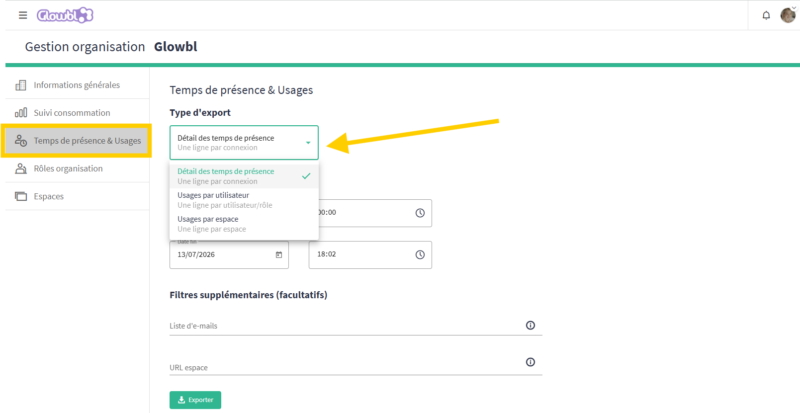
In addition to time-based and topic-based filters (by user/by space), three types of attendance time exports are now available to save you the trouble of reprocessing your data: say goodbye to pivot tables!
- Attendance Details: This is the standard, default export that generates one row per connection.
- Usage by User: Perfect for automatically consolidating each user’s activity. This export details the number, total duration, and average duration of sessions (connections > 30s) by user and by role (e.g., distinguishing Marie’s time as a moderator versus a participant).
- Usage by Space: Handy for ranking the most-used spaces. It compiles the number of sessions, associated facilitators, and unique visitors by space.
🔎 Simplify Space Searches
Find a space more easily with two new search criteria: by creator ( via email address) and by creation date. These filters are particularly useful for reassigning admin rights from a departing employee, or for retrieving recordings and summaries of sessions from a space you didn’t create yourself.
And there you have it—a way to bring some peace of mind to your events!
During this heat wave, you’ve been asking us a lot about our pool. So, to help you relax, we’ve prepared two packs in our layout gallery: 7 new pools and 9 floats with their various backgrounds!
We’d be more than happy to receive photos of your splashing sessions.🛟 Have a wonderful summer, everyone!

I am Aude-Marine Bertin, and as a Digital Learning Manager, I will guide you through getting started with Glowbl. I host workshops twice a week and run dress rehearsals ahead of your live sessions. With a background as a film editor and festival coordinator, I look forward to helping you create inspired and creative events, workshops, and training sessions. LinkedIn
